Battery switch on travel trailer function is crucial for managing your RV’s power. Understanding how your battery switch works is key to preventing electrical problems and maximizing your travel trailer’s battery life. This guide breaks down the different types of switches, how to use them safely, and what to do when things go wrong. We’ll cover everything from basic operation to advanced troubleshooting, making sure you’re confident in handling your trailer’s electrical system.
We’ll explore the various types of battery switches available, detailing their advantages and disadvantages. You’ll learn the correct procedures for connecting and disconnecting batteries, along with essential safety precautions. We’ll also delve into how the battery switch integrates with other electrical components in your RV, and how to troubleshoot common issues. By the end, you’ll be a battery switch pro!
Types of Battery Switches in Travel Trailers

Choosing the right battery switch for your travel trailer is crucial for managing your power sources efficiently and safely. Different types of switches offer varying levels of control and complexity, each with its own set of advantages and disadvantages. Understanding these differences will help you select the best option for your needs.
Single-Pole Battery Switches, Battery switch on travel trailer function
Single-pole switches are the simplest type. They control the power flow from a single battery source to the trailer’s electrical system. This means you can either connect the battery to the trailer’s system or disconnect it completely. The wiring is straightforward: the battery’s positive (+) terminal connects to one side of the switch, the other side connects to the trailer’s positive bus bar, and the negative (-) terminal connects directly to the chassis or negative bus bar.
So, you’re planning a trip? Awesome! Before you jet off, remember travel insurance is key. Check out Aon travel insurance for comprehensive coverage. They offer various plans, so find one that fits your needs and budget. Then, once you’ve got that sorted, consider comparing it to another provider like Aon travel insurance – sometimes different websites offer slightly different packages.
Doing a bit of comparison shopping can save you money in the long run!
This simplicity makes them easy to install and inexpensive, but they lack the flexibility of more advanced switches.
Double-Pole Battery Switches
Double-pole switches offer more control than single-pole switches. They control both the positive (+) and negative (-) sides of the battery connection simultaneously. This provides better safety as both connections are broken when the switch is off, reducing the risk of accidental shorts. The wiring involves connecting the positive and negative battery terminals to the respective switch terminals, and the switch outputs then connect to the trailer’s positive and negative bus bars.
So, you’re planning a trip? Awesome! Don’t forget travel insurance; it’s a lifesaver. Check out Aon travel insurance for comprehensive coverage. They’ve got options for everything from lost luggage to medical emergencies. Speaking of comprehensive, if you want another option to compare, look at Aon travel insurance – they often have different packages and pricing.
Comparing quotes is key to finding the best fit for your needs and budget. Happy travels!
While offering improved safety, they still only control a single battery.
Double-Pole Double-Throw (DPDT) Battery Switches
DPDT switches are the most versatile option. They allow you to switch between two different battery sources (like a house battery and a starting battery) or to connect either battery to the trailer’s electrical system. They are commonly used in setups with two batteries, providing the ability to charge one battery from the other or isolate them entirely. The wiring is more complex, involving connections to both batteries’ positive and negative terminals and the trailer’s positive and negative bus bars.
The switch positions control which battery (or neither) is connected to the trailer’s system.
Comparison of Battery Switch Types
| Feature | Single-Pole | Double-Pole | Double-Pole Double-Throw (DPDT) |
|---|---|---|---|
| Number of Batteries Controlled | 1 | 1 | 2 (or selection between 2) |
| Amperage Rating | Varies (typically 50-100 amps) | Varies (typically 50-100 amps) | Varies (typically 50-100 amps) |
| Ease of Installation | Easy | Easy | Moderate |
| Cost | Low | Moderate | High |
Battery Switch and Electrical System Integration
Your travel trailer’s battery switch is the central control point for your 12-volt DC power system. Understanding how it interacts with other components is crucial for safe and efficient operation. This section will explain the interplay between the battery switch, converter, inverter, and solar panels, highlighting potential problems and maintenance needs.The battery switch acts as a gatekeeper, controlling the flow of power from your batteries to the rest of your trailer’s electrical system.
It typically has several positions, allowing you to disconnect the batteries completely, connect them to the trailer’s house system, or connect them to an external charging source. Proper operation of this switch is essential for preventing electrical shorts and maximizing battery life.
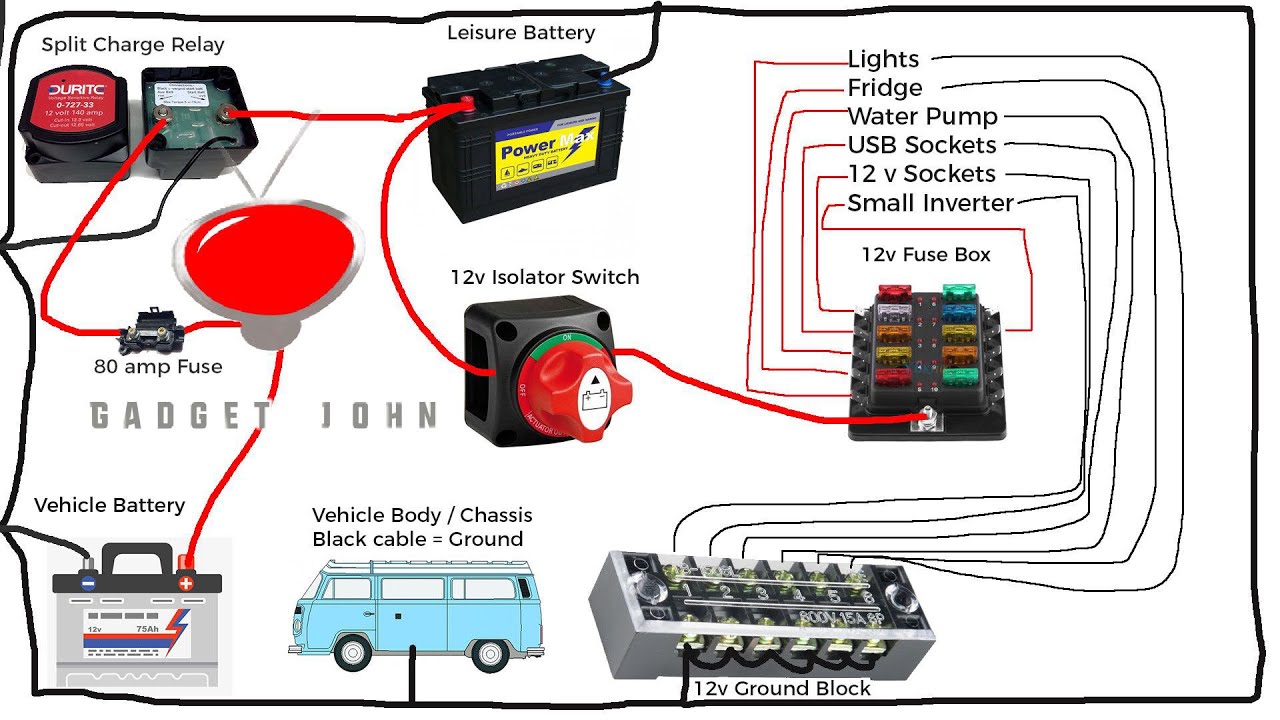
Electrical System Diagram and Power Flow
Imagine a simple diagram: Your batteries are at the heart of the system. From the batteries, wires lead to the battery switch. The switch then routes power to different parts of your system. One path leads to the converter, which transforms 12-volt DC power from your batteries into 120-volt AC power for your household appliances. Another path goes to the inverter, which does the opposite – converting 12-volt DC to 120-volt AC, typically for higher-power appliances or devices that need AC power.
Finally, a path connects to your solar panels, allowing them to charge your batteries when sunlight is available. When the battery switch is in the “off” position, all power flow is stopped, completely disconnecting the batteries. In the “on” position, power flows to the converter, inverter, and the charging circuit for your batteries from the solar panels.
If you have a separate “charging only” position, that would only allow charging from external sources such as shore power or solar panels, while disconnecting house loads. This prevents draining the batteries while charging them.
Consequences of Incorrect Wiring or Switch Configuration
Incorrect wiring can lead to a variety of problems, ranging from minor inconveniences to serious safety hazards. For example, if the battery switch is wired incorrectly, you might find that turning it “off” doesn’t actually disconnect the batteries, potentially leading to a drained battery and the inability to start your vehicle if your trailer is connected. Conversely, a short circuit due to faulty wiring could cause overheating, fire, or damage to your electrical components.
Incorrectly connecting positive and negative leads can result in immediate damage and a potential fire hazard.
Consequences of Neglecting Battery Switch Maintenance
Neglecting maintenance on your battery switch can lead to corrosion on the terminals, resulting in poor connections and increased resistance. This can lead to reduced power delivery, overheating, and ultimately, switch failure. Regular cleaning of the terminals with a wire brush and application of a corrosion inhibitor will prevent these problems and ensure the longevity and safety of your electrical system.
A failing switch could also lead to intermittent power outages or complete system failure, leaving you stranded. Regular inspection and testing of the switch’s functionality are crucial preventative measures.
Maintenance and Upkeep of Battery Switches: Battery Switch On Travel Trailer Function
Keeping your travel trailer’s battery switch in top condition is crucial for reliable power and preventing costly repairs. Regular maintenance ensures your batteries are properly managed and your electrical system functions flawlessly, extending the life of your components and preventing frustrating breakdowns on the road. Neglecting maintenance can lead to corrosion, loose connections, and ultimately, switch failure.Regular inspection and cleaning are key to preventing problems before they escalate.
A proactive approach is far more efficient than reactive troubleshooting. This section Artikels a simple yet effective maintenance schedule and procedures to keep your battery switch running smoothly.
Recommended Maintenance Schedule
A good rule of thumb is to inspect your battery switch at least once a month, especially if you frequently use your travel trailer. More frequent checks are advisable in harsh environments with high humidity or exposure to salt spray. Before each extended trip, a thorough inspection is recommended.
- Monthly Inspection: Visually inspect the switch for any signs of damage, corrosion, or loose connections. Check the surrounding area for any signs of leaking battery acid.
- Pre-Trip Inspection: Before any extended camping trip, thoroughly clean the terminals and connections, check for tightness, and verify the switch operates smoothly.
- Annual Maintenance: Once a year, perform a more in-depth inspection, including cleaning and tightening all connections, applying dielectric grease to terminals, and checking for any signs of internal wear.
Cleaning and Inspecting Terminals and Connections
Clean terminals and connections are essential for optimal electrical conductivity and preventing corrosion. Corrosion builds resistance, leading to reduced power delivery and potential overheating. Battery acid, dust, and moisture are the main culprits.
- Gather Supplies: You’ll need a wire brush (brass or nylon), baking soda, water, a spray bottle, and a clean cloth. Protective gloves are also recommended.
- Cleaning Process: First, disconnect the battery cables from the switch. Use the wire brush to carefully remove any corrosion from the terminals and switch connections. Mix a solution of baking soda and water in the spray bottle. Gently spray the terminals and connections, scrubbing again with the brush. Rinse thoroughly with clean water and dry completely with a clean cloth.
- Inspect for Damage: After cleaning, carefully inspect the terminals and connections for any signs of damage, such as cracks, breaks, or significant wear. Replace any damaged parts immediately.
Tightening Loose Connections and Addressing Corrosion
Loose connections create resistance and can lead to overheating and potential fire hazards. Corrosion exacerbates this issue.
- Tightening Connections: Use the appropriate wrench to tighten all connections securely. Avoid over-tightening, which can damage the terminals or connections. A snug fit is all that’s needed.
- Corrosion Prevention: After cleaning, apply a thin layer of dielectric grease to the terminals and connections. Dielectric grease prevents corrosion and improves conductivity.
Replacing a Faulty Battery Switch
If your battery switch fails despite maintenance, replacement is necessary. This is a task best done with some electrical knowledge or by a qualified technician. Improper wiring can lead to serious problems.
- Safety First: Always disconnect the battery cables before working on the switch. This prevents accidental shorts and shocks.
- Removal and Installation: Carefully remove the old switch, noting the wiring configuration before disconnecting any wires. Install the new switch, ensuring the wiring is correctly connected to the same terminals as the old switch. Consult your travel trailer’s wiring diagram if needed.
- Testing: After installation, reconnect the battery cables and test the switch to ensure it functions correctly. Verify that the batteries are properly isolated when the switch is off and that power is delivered correctly when the switch is on.
Mastering your travel trailer’s battery switch is about more than just turning power on and off; it’s about ensuring the safety and longevity of your RV’s electrical system. From understanding the different switch types to performing basic maintenance, this guide equips you with the knowledge to confidently manage your power, preventing costly repairs and maximizing your enjoyment on the road.
Remember to always prioritize safety and consult a professional if you’re unsure about any procedure.
FAQ
What happens if I leave my battery switch on all the time?
Leaving your battery switch on constantly can drain your batteries, especially if you have parasitic draws from appliances or electronics. It’s best to turn it off when not using the trailer for extended periods.
How often should I check my battery switch connections?
Inspect your battery switch connections at least once a year, or more frequently if you notice any performance issues. Look for corrosion, loose connections, or any signs of damage.
Can I use a battery switch with solar panels?
Yes, but you need to ensure the switch is compatible with the amperage of your solar panel system. Incorrect configuration can damage your equipment.
My battery switch is making clicking noises. What’s wrong?
Clicking noises often indicate a problem with the switch itself, a low battery voltage, or a loose connection. Check all connections and consider replacing the switch if the problem persists.
